Monday, March 31, 2008

lots of work, no results

This last week has been a lot of work with no results! After editioning both of the plates that I had ready to go before my press came, last week provided the opportunity to begin developing new plates. I have 3 small portrait plates in the works, in addition to continuing work on the portrait of Aung San Suu Kyi (I think I'm almost finished; may have pics later in the week) and preparing to start the second image in that series, Rachel Carson. However, none of these things are really at the photographing state, so as far as this blog goes, there are no results quite yet.

I also have decided to try and submit to a few print exhibitions. I have 2 in mind so far, both of which have a deadline in May, so I'll need to begin at least 2 prints for that. I have a few sketches of content ideas, but I haven't done any work for that other than actually ordering the plates and researching the exhibitions a bit. I'm not very hopeful about my chances of being accepted, as this is my first few months of serious printmaking, but I am enthusiastic about the process and ready to learn all I can to come back next year and maybe make the cut!

I've been struggling a bit with aquatinting. (Aquatinting, for those who aren't familiar with the process, is a technique in which a fine grain of acid resist is applied to a plate to create a uniform tone over large areas, instead of lines.) I have a few lung issues which make me quite afraid to use rosin, which is the traditional way aquatint is achieved. Rosin is very bad for lungs, and I don't have the capacity to safely handle rosin here at home. I've used spray paint a few times, which is okay but the lack of control over the grain has been quite frustrating to me. I read somewhere online that some success in duplicating aquatint can be had by pressing castor sugar into soft ground and then dissolving it away in water... I'll be experimenting with that this week and will post results. I really hope it works!

Since I have no printmaking photos, here's a photo of henna instead. I did this one last fall. ;)

DSCN3809.jpg

Sunday, March 23, 2008

what is etching?

Etching is a printmaking process dating back to the 15th century, using metal plates and pressure to make images. Albrecht Durer, Rembrandt, Goya, William Blake and Picasso all made etchings, as well as countless other artists through the centuries.

Basic etching involves six key elements: A metal plate, an acid bath or other corrosive substance, an acid resist, ink, paper, and pressure.

First, the metal plate. The plate must be prepared, which involves cleaning and polishing the surface of the plate and filing the edges of the plate to a bevel. This is done so that the edges of the plate don't cut through the paper when it's being printed.

etching 3

Next, the plate is cleaned, and when it is free from all oils and dirt, an acid resist is applied. This can be any number of things, but for the purpose of this explanation, we'll say it's hard ground. Hard ground is a liquid varnish of sorts that is simply painted on the metal plate and left to dry.

etching 6

Once the plate is covered with hard ground and dried, the artist uses a small sharp tool to draw a design or image onto the metal plate. Here you can see that where the drawing is, the metal plate is exposed.

etching 8

Once you have a drawing on your plate, it's time to put it in the acid bath. The metal plates I use are zinc, and they dissolve in nitric acid. The acid is very dilute (a 35% solution diluted at a ratio of 1:10), so the zinc dissolves slowly. Once you place the plate into the acid bath, the tiny exposed parts of the plate begin to dissolve, leaving behind etched lines.

etching 9

When the acid has dissolved the right amount of zinc, the plate comes out of the acid bath and gets rinsed off and cleaned. At this point, the work is assessed and either the process is repeated to make more lines on the plate, or it's time to print!

Printing is started by inking the plate. Ink is applied using a small card, and the ink is scraped across the plate surface. It's important not to get too much ink on the plate, but there must be enough ink to work down into every one of the tiny etched lines.

inking the plate, step 1

Next, the excess ink is wiped off the plate using a piece of tarlatan, a material similar to cheesecloth.

inking the plate, step 2

After this, the surface of the plate is polished clean with a scrap of newsprint or newspaper.

inking the plate, step 3

Edges are cleaned to ensure a good print.

inking the plate, step 4

After that, the plate is ready to print. The plate is placed face up on the press bed, covered with clean, damp paper, and then covered with a sheet of newsprint. The press blankets are lowered over all of that, and the print is ready to run!

DSCN7988

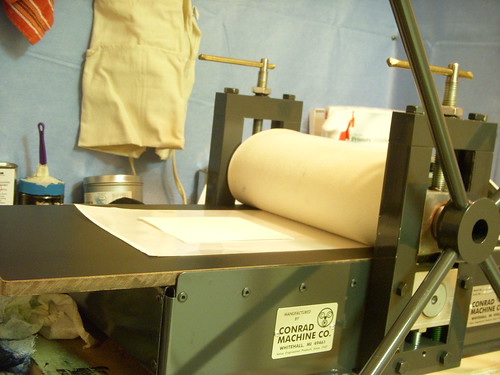
On its trip through the press, the plate and paper will be subjected to an incredible amount of pressure. Enough pressure to squish the paper into every teeny tiny little crevice of the plate. The paper gets pressed down into each crevice, and picks up the ink, and that's how an etching is made!

DSCN7979

Etching is a complicated process and there are many different techniques that can be used, but this is a brief explanation of the most basic technique. Whew!

Friday, March 21, 2008

prints to work on

Today I printed a copy of the portrait of Aung San Suu Kyi, and a few copies of an absolutely tiny butterfly plate. The butterfly plate is only 1 3/8" by 1 7/8", and it's printed in prussian blue. I haven't decided on a title for it yet, but I will be doing an edition.

tiny, tiny butterfly

zoom

The portrait is very much a work in progress. This is the first time I've seen it printed, so it's nice to have a better idea of which areas I need to work on. Specifically, I'll be working up the neck (which I completely forgot!), evening the background a little, burnishing out parts of the face shading, and fixing the ears.

first print of this plate

The portrait is large, 8" by 10", and all of the shading on this plate is done with lines. Little tiny lines. I used both hard ground and soft ground, and will most likely keep it that way as I go forward with the plate.

zoom

Hope you all have a wonderful, inspiring weekend! Next week I hope to get a brief explanation of the etching process up here.

Thursday, March 20, 2008

the new press, and my first edition

My press came! I am so excited to finally have it... even though it was a Christmas gift, it was ordered in November, so it's really been quite a wait, full of much breathless anticipation. The box was very heavy, as the press and the board it comes on are about 100 pounds, but we managed to get it up to the apartment and opened. Our two cats helped, of course. Kitimer was especially enthusiastic about the unwrapping.

Opening the box

Then we set it up, which was really incredibly easy. I was expecting a struggle! Basically, all we needed to do was screw on the handles of the star wheel and move it on the board, so it was closer to the edge. Here's Daniel working on screwing it back to the board after we moved it.

Daniel sets up the press

Once the press was in place, I set up the blankets and ran about 5 prints testing the pressure. I was expecting it to be harder to figure out, but it was really an easy process. The first prints were very light, so we just increased the pressure until they were dark enough. Simple enough!

Yesterday I set up a print drying rack that Amie Roman recommended to me from Sherrie Salida's blog. While it's not the exact setup she had, it's very close and such a wonderful option for those of us with little space! With a drying rack in place, and a functioning press, I was ready to print a small edition of my test plate. I ended up with an edition of 9 and 3 artist's proofs.

printing the edition

hanging up

I was also relieved to find out that the process is not at all too messy to be manageable in our hallway. Cleanup was easy and quick. All in all, it was a great first day with my press! Tomorrow I'll be working on a piece from my portrait series, and printing a couple of extra plates I have been working on a bit. Should be another fun day.

finished print

Wednesday, March 19, 2008

mother and child

I'm basically finished with the test plate for my press... at least, as finished as a person can be without ever having printed the plate! The image is a simple one, my wonderful cousin-in-law and her gorgeous new baby, and though it's not something I would normally make, I had a great time working on this print. I used a recycled plate and was mainly working it up as a test, but it turned out with a sweetness I wasn't expecting, so I think I may print up ten or so.

It's tiny, just 2.5 by 3 inches.

test plate

This photo is of the inked plate, as that's all I have to work from at present! One of the major challenges for me in etching is being able to see what the heck I'm doing on a plate... especially one with various techniques... the light off the polished and grooved zinc can get a bit confusing. I've been trying to ink this plate with every major decision, so I have a more firm idea of what exactly is going on.

I'll be preparing paper this evening. Since I've only ever printed in printmaking facilities, I'm expecting tomorrow will entail a LOT of trial and error in getting the pressure right and everything set up and ready.

the delivery company called...

My press is coming tomorrow! Between 11 am and 1 pm. Yay!

Monday, March 17, 2008

new series, times two

Since there was a 4 month delay between the ordering and delivery of the press, I had a while to think about what I would print. I already know that I work best in a series... I almost never am able to fulfill my interest with a subject in one picture, so a series offers me the chance to more fully explore topics from a variety of emotional angles. I also like to have more than one set of ideas to work on at any given moment... so that if one thing just isn't working, I can focus my attention on something else for a while.

I decided on two open ended series. One will be portraits of peace leaders and activists, and one will be a continuation of a naturalistic iconography that I was working on in my most recent paintings. The portraits will be on 8" by 10" plates, and the naturalistic images will vary in size and shape.

I'm really looking forward to both projects, for very different reasons. The portraits present several challenges that should be a lot of fun to address... those of likeness, of emotion, and of relevance to the subject's message. The naturalistic series involves the challenge of translating ideas that I've been working with in paint to the medium of printmaking. I know that I'll have a lot of failures along the way, but I am excited about these series and about the work involved in making the finished products that I've had in my mind for so long.

For me, with printmaking, it is very much about the joy of the process. I know that I have much yet to learn about etching, and I am looking forward to those lessons.

Below I've attached the first of the portrait series (it's just a pic of an inked plate, not a print) in a very early state. It's Aung San Suu Kyi, although the likeness will hopefully evolve more as the plate progresses. I've also included images of a couple of my paintings.

Happy printing!

diabetes 365 day 83 Dec. 25th 2007

the collector

the supplicant

Sunday, March 16, 2008

preparing for the press

My press should be arriving some time either this week or next. I am so excited! I live in a little apartment with my husband, so space is an issue, as is the fact that we have no garage / basement / other source of space where ink and acid wouldn't be a problem. Our apartment is 2 bedrooms, a living room, hallway, and two bathrooms. My husband's office is in the spare bedroom, and I don't want the press in our bedroom. I want to keep the living room available for company and hanging out. That leaves the spare bathroom and the hallway... so, that's where the press and acid bath will go!

Our hallway has a built in desk, which I've been slowly re-appropriating as an etching nook. First, my husband and I covered the walls and desk surface with a heavy duty drop cloth, to protect them from any ink. Fortunately, etching ink is very stiff and doesn't spill, so it's really only fingerprints and used wiping cloths that the surfaces need to be protected from. Next, we set up all the supplies I'll need, including plenty of newspaper for using underneath the messier aspects of etching. All that's missing now is the press!

Etching space

For the acid baths, we're using our spare bathroom. It has a big window and an incredible overhead fan, so it's wonderfully ventilated. We store our mixed acid in a plastic jug, and only pour it into the acid trays when I have a plate ready to bite. That way, we can keep most everything under the sink unless I'm actively printing.

The only thing I haven't quite figured out yet is where I'll dry the prints.....

about this blog

Hi, and welcome to my blog! I created this page to be a record of my adventures with my very first etching press, and as a space to share ideas and images that I'm working on.

I first learned etching when I was 19 and studying in Florence, Italy, my junior year of college. Our wonderful professor, Swietlan (Nick) Kraczyna, introduced myself and two other students to the various processes of etching, ranging from aquatint to mezzotint to drypoint to the more complicated multi-plate color etchings. Our studio was a centuries old stable, across a small courtyard from the Il Bisonte printmaking school. We worked for several hours each day, and after a few false starts and failures, I felt a connection to the process. I finished the year making portraits, learning more about the technicalities of the medium, and developing a real love for the visual language of etching.

A couple of the prints I made that year:

diabetes 365 day 37 Nov. 9th 2007

Etching

After returning to the states, I enrolled in a printmaking class for my final year in college, and struggled with finding the same feeling from the process that I had in Italy. Short classes, limited access to the presses, and strict assignments all contributed to making the class less of a passion and more of a duty. I left college still loving etching, but less hopeful about applying that love to my real life in some personally useful and meaningful way.

A course in graduate school restored some of my passion, although access to presses was still an issue (students signed up for time slots, and they were often full), and as a candidate for am MFA in Painting, I always felt like a bit of a guest in the printmaking studio. I missed the freedom of using a press whenever I wanted, and of making countless foolish, ugly mistakes without embarrassment. That year underscored the point that for me, the mood of a studio can be as important as its facilities.

After school, presses were harder to find, and seldom open for public use. My husband and I moved a few times, finally settling in a smaller town on the coast of Washington state, where press access for those not involved in school is simply not available.

For Christmas this year, my parents bought me a Conrad 12" etching press. I was (and am) so excited. Because they make each press one at a time, it will be arriving some time either this week or next. The opportunity to practice etching in my own home, any time I like, with my own materials and my own ideas, is a wonderful luxury. I am grateful to them for the gift and the opportunity, and am looking forward to exploring etching once more, on my own terms.